Everything You Ever Wanted to Know About Pipe Boots
Pipe boots are an incredibly versatile flashing choice for wood stove installs. We include a high-temp silicone pipe boot in every roof install kit we sell, since they work well for most installations.
Types of Boots
The two major types of pipe boots are EDPM (usually black or gray) and high-temp silicone (usually bright orange).
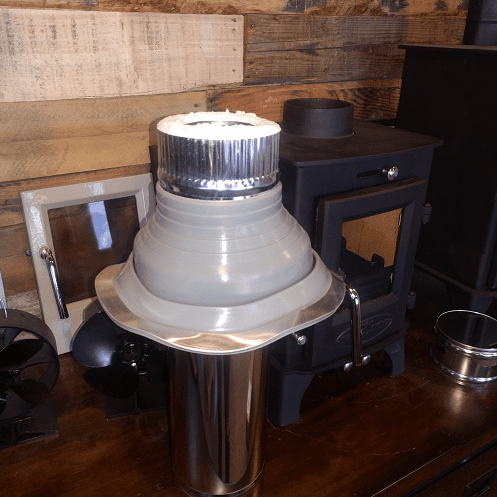
High temp silicone is typically orange for ease of identification, but there's no physical reason the material needs to be orange. We carry two sizes of high-temp silicone boots in a custom gray color for aesthetic reasons.
The major difference between high-temp silicone and EDPM boots are their temperature ratings. EDPM can withstand 212° F continuous, or 275° F intermittent. High-temp silicone withstands 392° F continuous, or 482° F intermittent.
Pipe boots have round or square bases. The round base provides a more compact profile, while the square base will cover a larger hole. If you use a square base boot on a pitched roof, it's best to point the corner toward the roof slope. A "diamond" orientation provides more coverage for the long side of the hole, and helps the boot shed water.
For extremely steep pitches, "extreme angle" pipe boots have a built-in pitch. However, the base of the boot is usually not large enough to cover the required clearance cutout around insulated pipe on a steep slope. Additionally, it can be harder to find "extreme angle" in silicone and in larger sizes.
Pipe Boot Applications
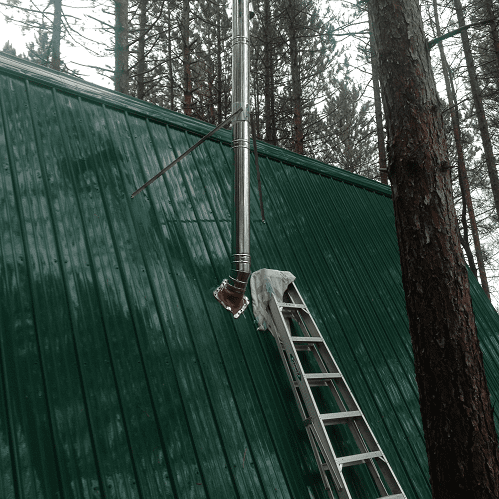
Pipe boots work well on nonporous roofing surfaces like rubber or metal roofs. The flexible mounting flange allows the boot to conform to corrugated or curved roofs.
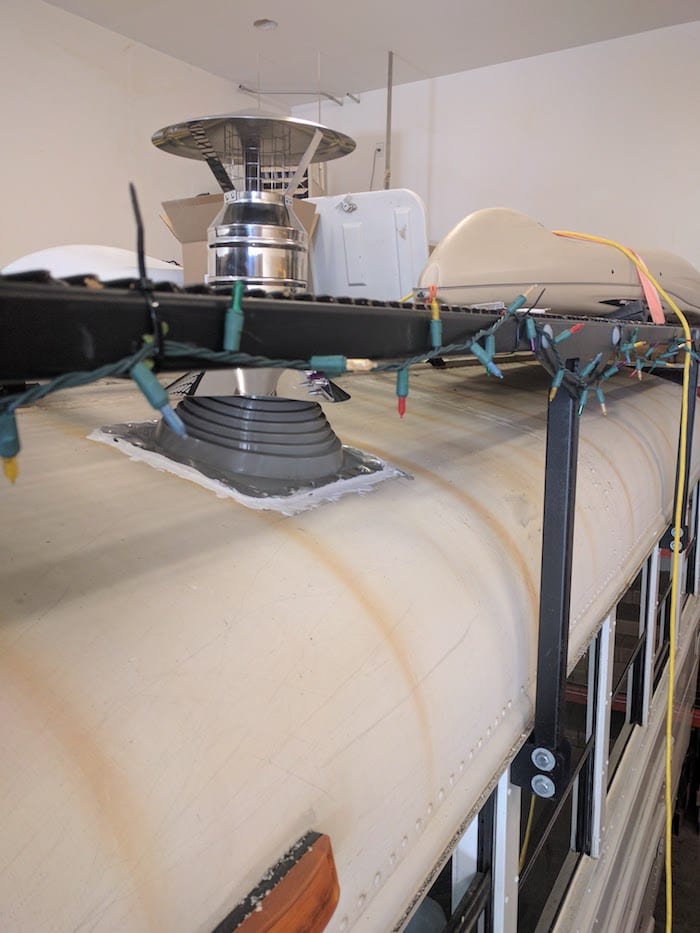
Pipe boots are an especially attractive option for mobile applications because of their flexibility. On a THOW or RV/Bus application, a pipe boot is able to flex while travelling without damaging the watertight seal. A rigid flashing is likely to fail due to bumps and vibrations, while a pipe boot will absorb vibrations without weakening.
Applications to Avoid
Pipe boots mount on the roof surface, so they need a solid, nonporous substrate to work. Pipe boots will not work with shingle roofs or most roofing tile systems.
If you have a shingle roof, you need a metal flashing that you can lap under the shingles. Metal flashings should match both the pitch of your roof and the outer diameter of the insulated pipe. (Our 3" insulated pipe is 5" in diameter, 4" is 6", and 5" is 7".)
Pipe boots may not be practical for steeply pitched roofs like those in A-frame cabins. Because the chimney needs to be vertical, the hole for passing through a steeply pitched roof can be a fairly tall oval. If the flange of the pipe boot is too small to cover the hole plus enough overlap to create a watertight seal, it can't be used.
Possible solutions for a steep roof are using a metal flashing instead, or using two 30 degree elbows (available in 4" or 5") to soften out the angle at the penetration and add an extended support bracket for stability. You could also try positioning the stove against a vertical wall, and using a wall exit instead of a roof exit.
Can I use a pipe boot with single-wall stovepipe?
Silicone pipe boots are not designed to be used with single-wall stovepipe connected to a wood stove. Silicone boots are rated to 392° F degrees F continuous and 482° F degrees F intermittent, both of which are temperatures that can be exceeded during normal operation of a wood stove.
It's generally not permitted to use single-wall pipe to penetrate your roof. Single-wall pipe needs 18" clearance to combustibles, so you might need to cut away significantly more material than the boot would cover. NFPA-211 (the industry standard for household wood stoves) requires that the pipe used to penetrate the roof needs to be either double-wall insulated or air-cooled triple-wall Class A pipe. We offer double-wall insulated Class A pipe in 3", 4", and 5" for that purpose, which can be used with a pipe boot.
Placement of Your Boot
Before cutting a hole in your roof, you'll need to plan the placement of the boot.
Determine the location and footprint of the hole that you'll need to cut, and make sure the base of the boot is large enough to cover it with room to spare to seal the flange to the roof.
DO NOT CHOP A HOLE IN YOUR ROOF UNTIL YOU'RE SURE THE BOOT YOU HAVE WILL COVER IT!
The boot included with our kits works well for most installations, but not for every conceivable application. It's much easier to find a solution for a too-small boot without the added pressure of a hole in your roof.
Insulated pipe needs 2" clearance to combustibles, so for a 4" insulated pipe (which is 6" outer diameter), you'll cut a 10" diameter circle on a perfectly flat roof. However, if your roof is pitched, you'll cut an oval with a height longer than 10".
If you have a boot with a square base, orienting the corner of the boot toward the roof peak can give you a little extra room to cover an oval hole in a pitched roof. Pointing the corner upward will also make it easier for the boot to shed water.
If you have a standing seam metal roof, it's best to place your roof penetration between the seams. It's easier to create a good seal if the flange can attach to an entirely on a flat surface. However, if you need to go up and over a seam, that's also possible.
Prepping the Boot for Installation
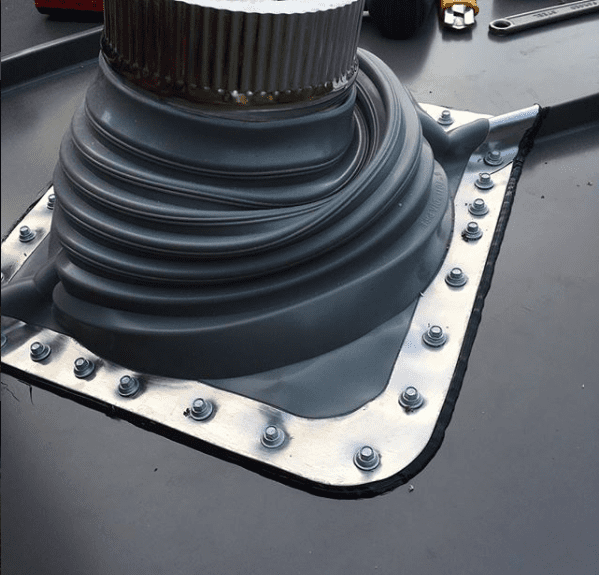
The side of the pipe boot with the aluminum ring is the top. The aluminum ring reinforces the flange where the fasteners pass through it, and provides some rigidity for a watertight seal.
In order to create a watertight seal with the stovepipe, the hole should be approximately 20% smaller than the pipe's outer diameter. It should fit snugly.
Depending on your pipe size, you may need to cut your boot to fit the pipe.
Compatibility with Roof Support Bracket

The Roof Support bracket included in our kits can be installed on the roof below the pipe boot. However, there are other ways to install the bracket. You can install the bracket on the ceiling instead, hidden by the ceiling trim plate. Or you can mount it in the space between the ceiling and the roof. It's also acceptable to install the bracket upside-down if that works better. Generally, installing the bracket somewhere accessible (not buried under the pipe boot) is best.
If you want to install your support bracket under your boot, check first whether it fits under the boot. Depending on your application, you may need to trim the ends of the L-brackets to get them to fit under the boot flange. If the clamp is interfering with the pipe boot on a pitched roof, you can try orienting the bracket so the bolt is on the high side of the roof. For some installations, you may want to cut the top corner off the clamp with an angle grinder, or you can flip the entire bracket upside-down so the clamp is mostly contained under the roof line.
Sealing
You will need to seal the base of the pipe boot to your roof with silicone or urethane roofing sealant. This product should not touch the stovepipe, so high temp silicone is not necessary. Use whatever product is recommended for your roofing material.
The boot does not need any sealant where it meets the stovepipe. The tight fit between the silicone boot and the pipe creates a watertight seal on its own.
The boot flange must be held tightly to your roofing material while your sealant cures. You may want to test-fasten the boot to your roof before adding sealant to make sure you have the placement right. It's usually best to attach fasteners from the center outward (relative to your roof pitch) to ensure your flange is installed flat to your roof. If your roofing surface is corrugated, be sure you install a fastener at the belly of every curve.

In order for sealant to cure properly, the surface must be clean, dry, and not frozen. Prep the surface by cleaning it with a solvent before applying the sealant. Read the directions on the back of your sealant, and follow them. Check the weather forecast before you start to ensure the sealant will have time to cure.
Seal under the boot flange with silicone or urethane roofing sealant. Place fasteners through the flange and into your roof surface. The best fastener type will depend on your roofing material. In general, we recommend rivets for a sheet metal roof with no sheathing underneath, or roofing screws for a metal or rubber roof with wood sheathing underneath.
Once the boot is fastened to the roof, add more sealant around the perimeter of the boot and on top of each of the fasteners, and smooth over for a clean, watertight finish.
Adding a Storm Collar
A storm collar is optional if you are using a pipe boot, but it is required if you're using a metal flashing. Storm collars direct water away from the top of the flashing, and serve as a backup against water intrusion. Where a storm collar is required, you should seal it to the outside of the stovepipe with high-temperature RTV silicone, immediately above the flashing.